
This tutorial will go over step by step how to install Arch Linux on a server. We will not be installing it on a desktop environment so there will be no GUI. There is a lot to do to install and setup the system so be prepared to commit at least five hours to install and do some basic research on topics such as partitioning the drive, or which bootloader to choose.
Arch Linux is my current distribution of choice, main reason is rolling release and the fact that you need to setup everything yourself. In return for that thankless job, you will gain a lot of knowledge about Linux!
Previously I used Ubuntu but found that a lot of the packages I used were outdated, and then, Canonical started to push snapd too hard. So I begun to look for something else, and found my new home – Arch Linux.
Foolish assumptions Link to heading
- You have physical access to the server.
- The server is connected to internet.
- You are comfortable with command line.
- Your main goal is to learn something new.
Content Link to heading
- Pre-installation checklist
- Booting into Arch Linux Live OS
- Arch Linux Live OS setup
- Preparing storage for new system
- Installing Arch Linux using pacstrap
- Generating fstab file
- Using chroot to “login” into new system
- Installing additional packages
- Optional: Setting up git for /etc/
- Setting up nano editor
- Installing bootloader (GRUB)
- Adding microcode to GRUB loading procedure
- Generating grub.cfg file
- Creating new user
- Booting into new system
- Basic setup
- Network setup
- Time and date setup
- Localization
- Lower GRUB countdown timer
- Setting up Fish shell as default shell
- Setting up SSH
- Conclusions
1. Pre-Installation checklist Link to heading
First things first. In order to install Arch Linux we need to download the ISO file and create a bootable media on USB / CD / DVD.
Go to Arch Linux website and at the top right corner you will see download page link.

Once on the page you can choose from variety of options such as BitTorrent or HTTP. Once you scroll to HTTP you will see a global section, and below it, a list of countries with list of mirrors.
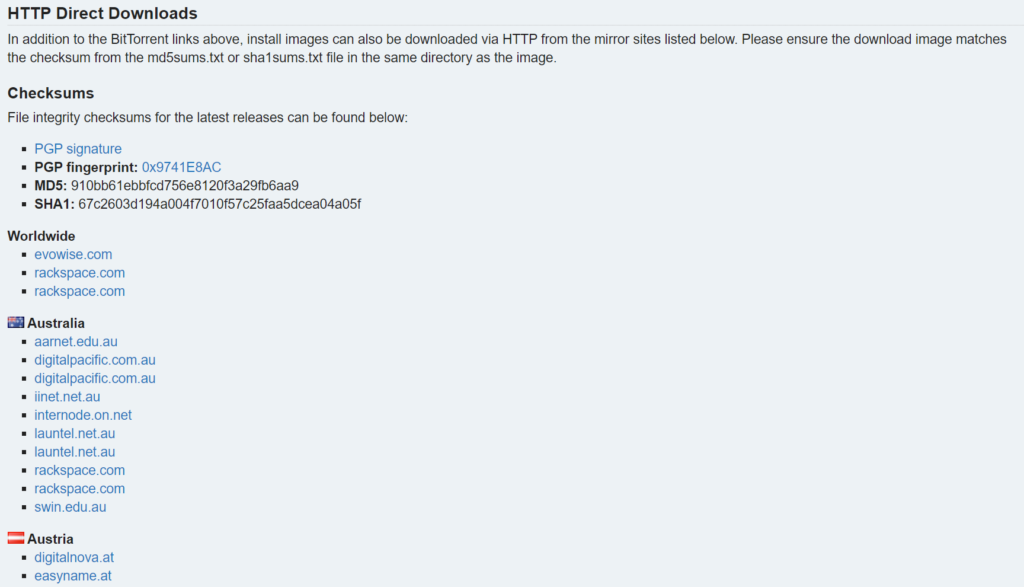
Choose the closest one to your location and click on one of the mirrors. Poland is the closest one to me. So I have choosen icm.edu.pl

You should download the current ISO file archlinux-*-x86_64.iso. These files are generated at the beginning of each month. Once the iso file is downloaded, we want to create a bootable media. I recommend balenaEtcher. You can follow their guide how to use it to create bootalbe media.
2. Booting into Arch Linux Live OS Link to heading
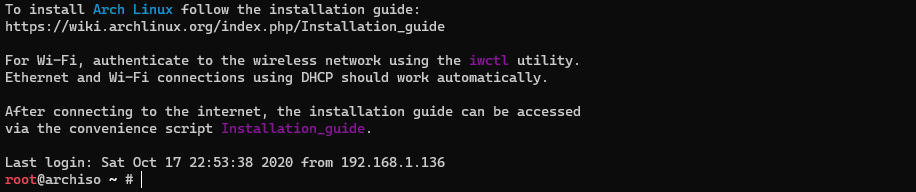
Now that we have bootable media ready, use it to boot the Arch Linux Live OS. It will likely involve inserting bootable media into the server, and restarting the machine. Each manufacturer uses a different key. Sometimes it is F2, F10 or ESC key. If you don’t know which one, just google it “how to boot from USB [manufacturer or model here]” in my case “how to boot from USB Intel NUC” shows article on Intel site where I found that it is F10 key.
If everything went correctly you should see something similar to this:
3. Arch Linux Live OS setup Link to heading
First, we want to check if the internet connection is working. If you have wired connection run ping google.com. To stop pinging use CTRL+C. if you are connected to internet, you should see something similar to this:
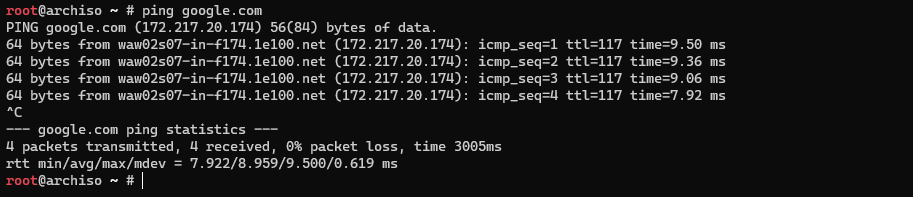
If you, on the other hand, need to use WIFI to connect to the internet use iwctl tool. you can run iwctl --help to get more information how to use it. In short, to find out your device name run iwctl device list and once you are ready to connect use iwctl station [device name] connect [network name] [security]. If everything was done correctly, you should be able to ping google.com and see similar output as in the above screenshot.
Before we continue to set up the storage, we want to sync the clock using NTP. To do this, we will use timedatectl tool. As always, the first thing you want to do is get familiar with what the tool can do. To do so, run timedatectl --help.

To set NTP we want to run timedatectl set-ntp true. To verify that we did it correctly, run timedatectl status. You will see NTP service: active. Now, we are ready to prepare our storage for installing Arch Linux.
4. Preparing storage for new system Link to heading
It should really come as no surprise, we need some persistent storage where we could install Arch Linux. For now, we have only run Arch Linux Live OS in RAM so everything we setup so far will be gone once we restart the machine. If you refer to the official Arch Linux installation guide you will see that for UEFI with GPT we need to have a minimum of two partitions: EFI and ROOT. SWAP is optional and I recommend you reed Arch Linux SWAP wiki and decide if you need it or not. When considering SWAP you should take into consideration storage type (SSD, HDD or SD Card), RAM size and of course what you will be running on that machine. I will setup a SWAP partition for completeness, however, you should research the subject on your own.
In my Intel NUC I have 240GB SSD with Ubuntu installed. Before we install Arch Linux I will show you how to remove all partitions and then setup partition that we need.
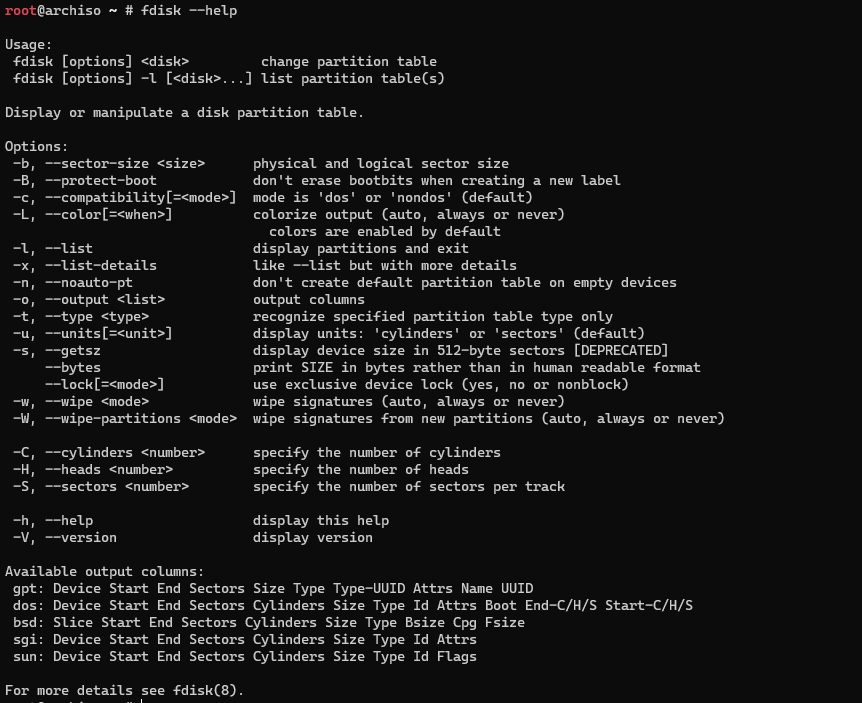
First, lets list available drives on the machine. To do that, we will use fdisk tool. As always, you want to run fdisk --help to see what you can do with a given tool. You should see:
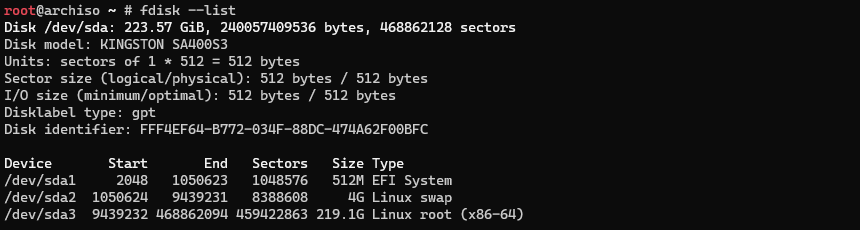
Since we want to find out what drives are available to us, let’s run fdisk --list
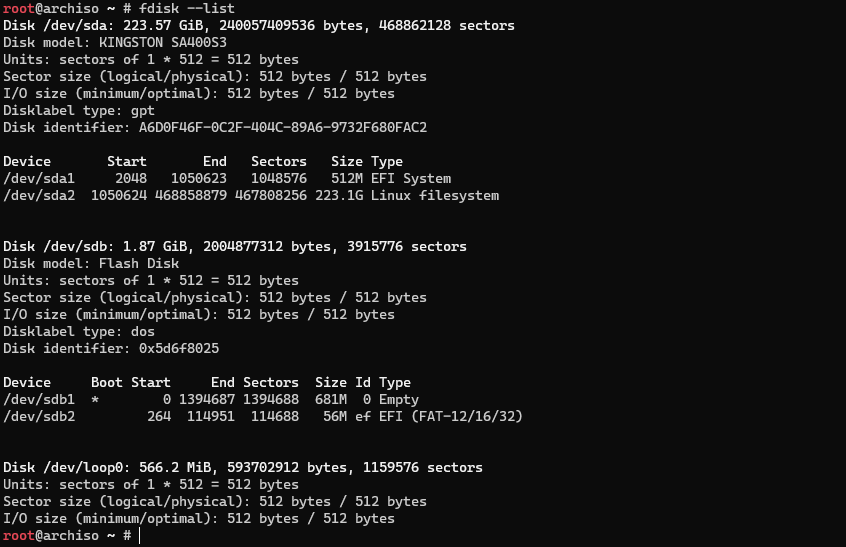
In my case, the results show three drives. /dev/sda – 240GB SSD, /dev/sdb – bootable USB with Arch Linux Live OS, /dev/loop0 – you can read more here about loop devices. To understand naming convention of Linux devices I personally recommend this article.
When you take a look at results of fdisk --help, the usage section shows command to “change partition table” this is exactly what we want! Because we are interested in /dev/sda drive we will run fdisk /dev/sda. The result should look like this:

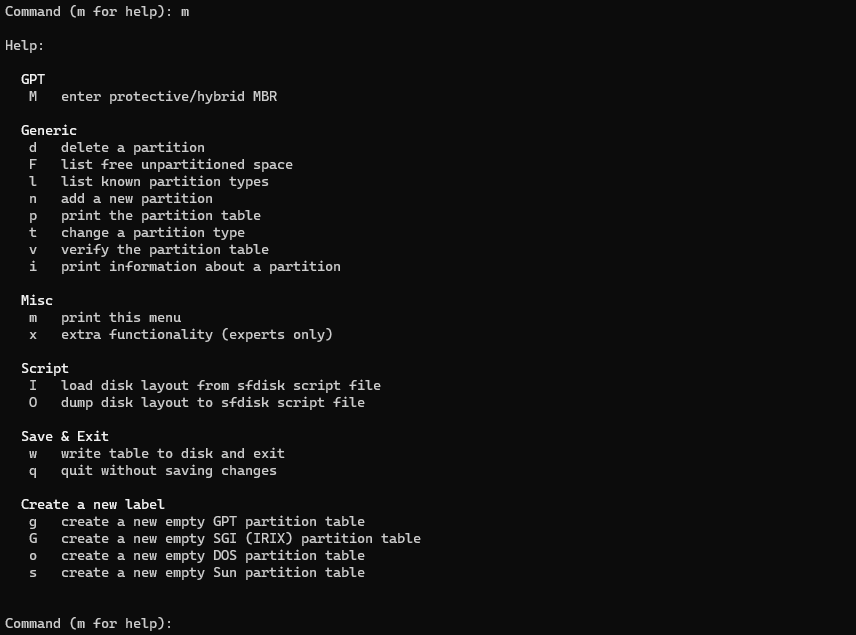
I hope this will come as no surprise, and something you should do every time… Let’s check help by hitting m on the keyboard 😊
First, we will check information about partitions using i command:

Since we want to start fresh, we will delete both partitions using d command:
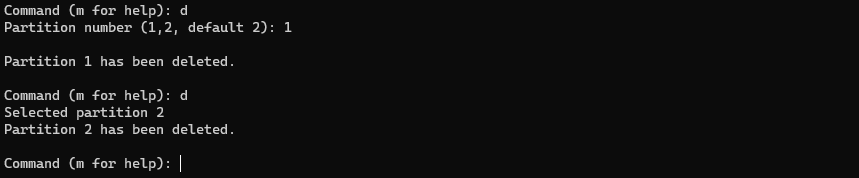
In the first step we deleted partition 1, in second step there was only one partition left so we did not have to specify it. Command w will save the changes so lets do it!

To verify everything went correctly lets run fdisk --list
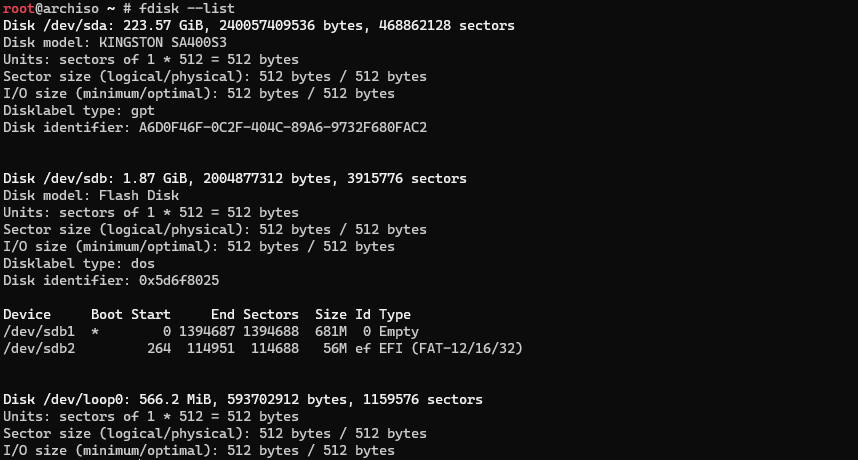
Grerat, the /dev/sda drive has no partitions. We can now setup three new one’s.
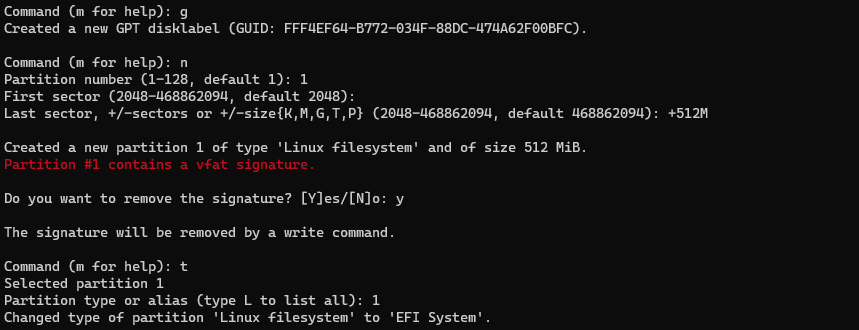
EFI – first partition of 512MB, formatted as vfat
SWAP – second partition of 4GB, formatted as swap
ROOT – third partition with remaining storage, formatted as ext4
Let’s begin!
fdisk /dev/sdamcommand for help.gcommand – we want to create empty GPT partition table.ncommand – new EFI partition.1– partition number.enter– default value for first sector.+512M– last sector should be +512M from first sector.y– since I had Ubuntu installed before, we want to overwrite it.t– change partition type.1– EFI system.
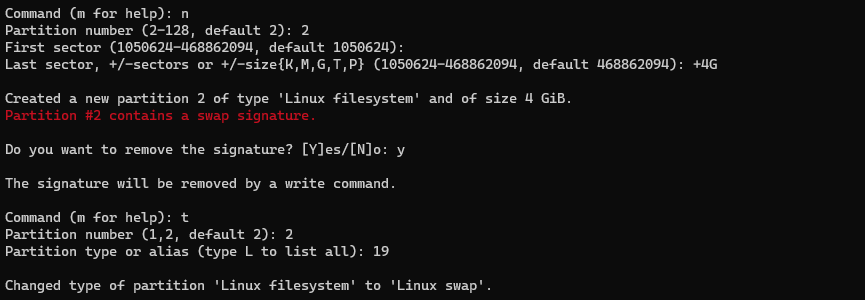
Now it’s time to create a second partition for SWAP.
ncommand – new SWAP partition.2– partition number.enter– default value for first sector.+4G– last sector should be +4G from first sector.y– since I had Ubuntu installed before, we want to overwrite it.t– change partition type.19– Linux swap.
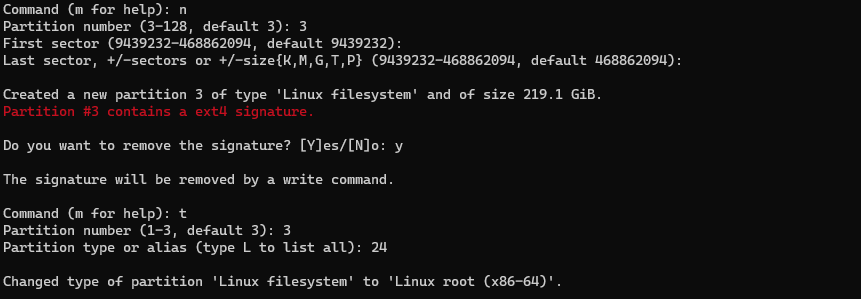
Last, but not least, let’s create third partition for ROOT. We want this partition to be the largest because all our data will go here.
ncommand – new ROOT partition.3– partition number.enter– default value for first sector.enter– default value for last sector. (remaining disk space)y– since I had Ubuntu installed before, we want to overwrite it.t– change partition type.24– Linux root (x86-64).
All the changes so far have been saved to memory only, so if you want to change something you can use q command that will quit without saving changes. If on the other hand everything looks good, we can use w command which will write table to disk and exit. to verify everything went as planned let’s once again use fdisk --list command.

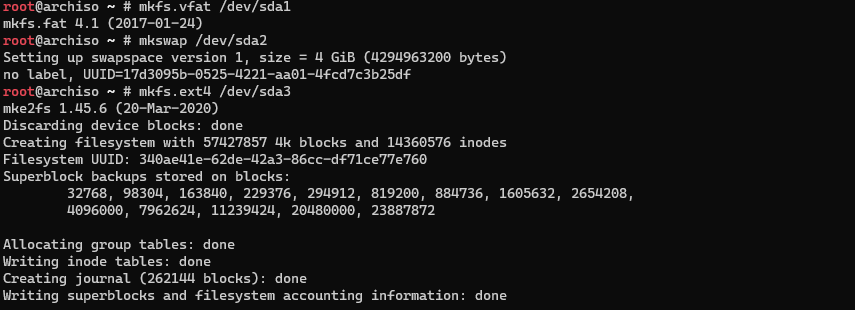
Awesome! now we have three new partition /dev/sda1 – EFI, /dev/sda2 – SWAP and /dev/sda3 – ROOT. Next step is to format them with appropriate file system type.
We will use mkfs tool (MaKeFileSystem) and mkswap tool
Let’s check help for these tools:
mkfs --help
mkswap --help
and commands for formatting our three partitions:
mkfs.vfat /dev/sda1
mkswap /dev/sda2
mkfs.ext4 /dev/sda3
To check we done everything correctly let’s run fdisk --list
Now that we have prepared our storage we can begin installing Arch Linux.
5. Installing Arch Linux using pacstrap Link to heading
Before we install packages to our newly formatted partitions we need to mount them using mount tool before proceeding check mount --help. ROOT partition will be mounted in /mnt and EFI in /mnt/efi.
mount /dev/sda3 /mnt
mkdir /mnt/efi
mount /dev/sda1 /mnt/efi
Once the partitions are mounted, the installation process is quite simple and we will use pacstrap to install all necessary packages. First, lets run pacstrap --help

Besides “base” group we will add linux and linux-firmware. When we use pacstrap we need to provide path where to install the packages. The final command should be:
pacstrap /mnt base linux linux-firmware
This process will take some time and will depend on your CPU, RAM, SSD/HDD and internet connection speed.

Few things should get your attention. Warnings regarding possible firmware missing, locale settings and stats of the executed command.
In my case I don’t need to worry about the first, as this hardware is not present on my machine. With locale settings we will deal later. For stats you will see the process was rather quick on my machine.
6. Generating fstab file Link to heading
To generate fstab file run genfstab -U /mnt >> /mnt/etc/fstab. To read more I recommend reading the official Arch Wiki. if you want to check what’s inside you can use nano /mnt/etc/fstab
7. Using chroot to “login” into new system Link to heading
Before we actually boot into our system, we can use arch-chroot. To see basic info about this tool execute arch-chroot -h
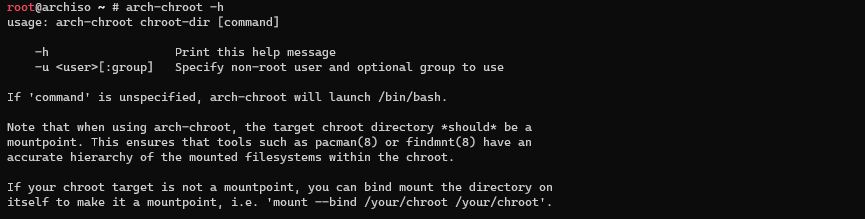
In our case we can execute arch-chroot /mnt with default options. It will appear that you are no longer in the Live OS environment but in our newly installed system. Using arch-chroot will use Live OS network configuration so we don’t need to do much configuration to begin.
8. Installing additional packages Link to heading
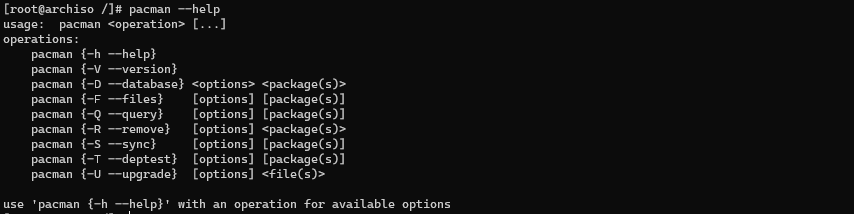
In CLI, I prefer to work in fish shell and use nano editor. Because we have left Live OS we can install fish and nano editor. The installation will persist. In Arch Linux, we will use pacman to manage applications. You can think of pacman as apt in Debian or yum in CentOS. By now, you know what will be the first thing we will execute: pacman --help
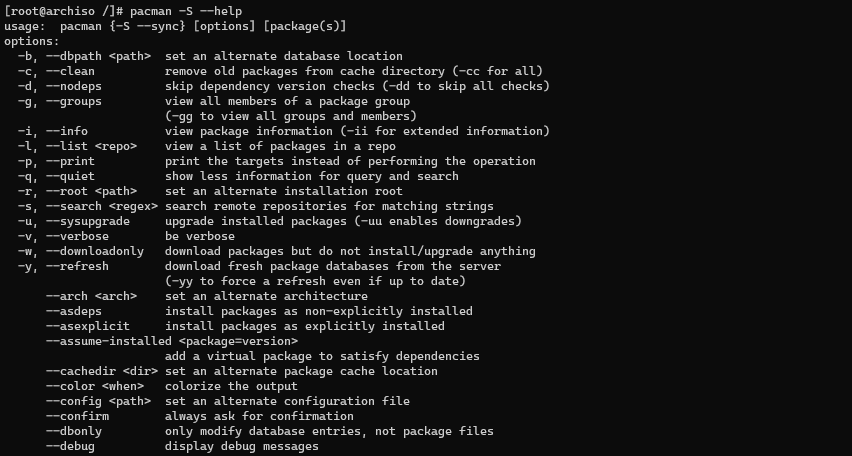
at first we want to sync so let’s check pacman -S --help
First thing, we want to do is refresh and upgrade installed packages. pacman -Syu
Since we just install all the packages everything should be up to date. To install fish, nano and git we need to specify package names at the end of the command, so now lets execute pacman -Syu fish git nano

There will be additional packages installed. You will be asked to confirm the installation of these packages with Y.
9. Optional: Setting up git for /etc/ Link to heading
I like to setup git repo in /etc/ directory and track changes to the configuration of my machine. It comes very handy when something goes wrong. Of course please DO NOT push this repo to GitHub or other online git site. Arch Linux suggests etckeeper for this purpouse.
- Before we begin lets run
fish - Then,
cd /etc - configure git by setting up user name, email and default editor.
git config --global user.name "your user name"git config --global user.email "your email"git config --global core.editor "nano -w"git init– to initialize new reponano .gitignore– to exclude certain files and directories (list of suggested exclusions at the end of the list) to add all the files from the /etc/ directory executegit add .git committo commit changes. Nano editor will be opened so you can check the files included and provide comment. I added “initial commit”chmod -R 600 /etc/.git/
.gitignore suggested exclusions:
/shadow
/shadow-
/.updated
/ssh/moduli
/ssh/ssh_host_ed25519_key
/ssh/ssh_host_rsa_key
/ssh/ssh_host_dsa_key
/ssh/ssh_host_ecdsa_key
/ld.so.cache
/docker/key.json
/pacman.d/gnupg/trustdb.gpg
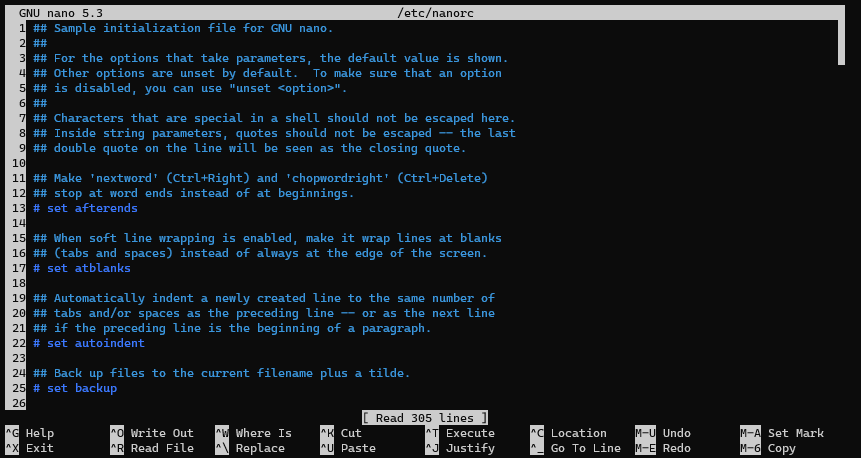
10. Setting up nano editor Link to heading
To add syntax highlighting in nano we will need to install nano-syntax-highlighting package. Execute pacman -Syu nano-syntax-highlighting
Now, lets edit nano config file nano /etc/nanorc
go to the end of the file and add:
set tabsize 4
set linenumbers
set softwrap
set indicator
include "/usr/share/nano-syntax-highlighting/*.nanorc"
Once you save and exit nano, open the same file again (arrow up on your keyboard) and you will see that the file has syntax highlighting. great!
Now that we changed some configuration, we can commit changes if you have chosen to use git.
cd /etc
git status
git diff
git add .
git commit
and provide comment such as “nano highlighting added and config”
11. Installing bootloader (GRUB) Link to heading
So far, we used arch-chroot to ‘login’ into our system. If you try to reboot into our OS it will unfortunately fail because we do not have bootloader installed yet. First, we need to install some packages with
pacman -Syu grub efibootmgr
grub-install --target=x86_64-efi --efi-directory=/efi --bootloader-id=GRUB
To read more about the process I highly recommend Arch Boot Process article.
12. Adding microcode to GRUB loading procedure Link to heading
What is microcode you ask? Arch Linux Wiki is your best friend! Take a look at Microcode article to get familiar. Depending on your CPU manufacturer, you will need to install intel-ucode or amd-ucode package. In my case it is Intel so:
pacman -Syu intel-ucode
13. Generating grub.cfg file Link to heading
Now that we have grub tools and microcode packages installed we can create grub.cfg file by executing:
grub-mkconfig -o /boot/grub/grub.cfg
If everything was done correctly, you should see something similar to this:

If you installed microcode, make sure it was found and added:
Found initrd image: /boot/intel-ucode.img
You should take a look into this file with:
nano /boot/grub/grub.cfg
You can adjust the boot process to your needs. I, for example, always decrease the countdown for choosing fallback option. Since it is headless server, I much rather have the system be quickly available online after reboot.
If you opted for git then:
cd /etc
git status
git diff
git add .
git commit
and provide comment such as “grub installed”
14. Creating new user Link to heading
It is a good practice not to use ROOT user. We will create a new one and disable ROOT login to harden our OS. To execute commands with elevated rights we will use sudo. I will add a user ‘kuba’ but you should change it to whatever you want it to be.
pacman -Syu sudouseradd --create-home kubapasswd kubayou will be asked to create a password. Checkpasswd --helpfor more infonano /etc/sudoersmodify line ‘root ALL=(ALL) ALL‘ and instead of root add newly created user – in my case ‘kuba ALL=(ALL) ALL‘ This allows specified user to run any command as ROOT usingsudopasswd --delete rootdeletes password for user rootpasswd --lock rootlocks the accountnano /etc/passwd- change
root:x:0:0::/root:/bin/bashtoroot:x:0:0::/:/usr/bin/nologinso no one can login with ROOT user directly
If you opted for git then:
cd /etc
git status
git diff
git add .
git commit
and provide comment such as “added user kuba and disabled root”
15. Booting into new system Link to heading
Now we are ready to say goodbye to Arch Linux Live OS and boot into our new system. First, we need to exit fish shell so lets execute exit, then exit arch-chroot so exit once again, and now, we are back in Arch Live OS. You can check shutdown --help to find out how to reboot the machine. We can use shutdown -r now.
16. Basic setup Link to heading
Once your new system boots, you will need to login with user name and password you created. If you opted to use git, lets check for changes to configuration.
cd /etc/
sudo git status
sudo git diff
sudo git add .
sudo git commit
on the last command you will see that git will ask for identity. Previously we used git using ROOT user, now we are using a different one so we need to provide email, name and default editor.
sudo git config --global user.name "your user name"
sudo git config --global user.email "your email"
sudo git config --global core.editor "nano -w“
Now, we can commit changes once again with sudo git commit. Provide comments such as changes after first boot
17. Network setup Link to heading
If you try to ping google.com you will find that network is not setup. Live OS and arch-chroot use default settings, however, once you install your system it is up to you to setup and make all the decisions.
First we will use hostnamectl tool and the first thing we will do is check help so lets type:
hostnamectl --help
hostnamectl status – to check current setup
sudo hostnamectl set-hostname nuc01 – you should change nuc01 to whatever you want your hostname to be. Now, when you execute hostnamectl status you should see static hostname updated. To read more about hostnamectl check this man page.
Second, we need to modify /etc/hosts file. To edit this file we run
sudo nano /etc/hosts
add:
127.0.0.1 localhost
::0 localhost
127.0.1.1 nuc01.local nuc01
To better understand what this file is for read this article
Third, to setup network we will use systemd-networkd since it is included in the “base” group we installed using pacstrap. This info can be found in network_cofiguration article on Arch Wiki. You will also find, that the tool networkctl is default for systemd-networkd. You can read more about networkctl here.
To setup network we will need to know which network device we have on our machine. To check this, we will use ip command. As always, we start with
ip --help – I don’t know about you, but this time –help is not that helpful.
ip link – we are looking for a link object.
The results should be a list of network interfaces available. In my case it is
lo – loopback
enp3s0 – wire
wlp2s0 – wireless
Now, to proceed you should read these two articles:
Arch Wiki – systemd-networkd
Arch Manual Pages – networkctl
Once you read these, you will note that we need to create a file in /etc/systemd/network where we will add our config file. In my case, I only need one configuration file. I will call it 10-wire-wireless.network. if you need more, check articles above to understand how to do so, and in which order they will be loaded.
sudo nano /etc/systemd/network/10-wire-wireless.network
For my needs and purposes, the file looks like this:
[Match]
Name=enp3s0 wlp2s0
[Network]
DHCP=yes
LLMNR=yes
MulticastDNS=yes
DNSSEC=yes
DNSOverTLS=yes
DNS=1.1.1.1 1.0.0.1 2606:4700:4700::1111 2606:4700:4700::1001
FallbackDNS=8.8.8.8 8.8.4.4 2001:4860:4860::8888 2001:4860:4860::8844
[DHCP]
UseDNS=no
I have decided to have one config file for both network interfaces, use DHCP for IP assignment, use LLMNR, MDNS, DNSSEC and DNSOverTLS, and specify my choice of DNS and Fallback DNS. In the [DHCP] section, I specified that I do not want to use DNS advertised by my ISP. That’s why you will see there UseDNS=NO. Of course, you should decide for yourself what you need. All the information on how and what you can do, you will find in these two articles above. Now, similar changes for resolved service:
sudo nano /etc/systemd/resolved.conf
I like to setup the resolved.conf file same as the *.network file as I just have a single network.
[Resolve]
DNS=1.1.1.1 1.0.0.1 2606:4700:4700::1111 2606:4700:4700::1001
FallbackDNS=8.8.8.8 8.8.4.4 2001:4860:4860::8888 2001:4860:4860::8844
LLMNR=yes
MulticastDNS=yes
DNSSEC=yes
DNSOverTLS=yes
One important information in the Arch Wiki – systemd-networkd article is that “The systemd-resolved service is required if DNS entries are specified in .network files.” We will need to make sure we enable this service and create symbolic link between /run/systemd/resolve/stub-resolv.conf and /etc/resolv.conf
First, lets create symbolic link
sudo ln -sf /run/systemd/resolve/stub-resolv.conf /etc/resolv.conf
Now, any application will know to contact 127.0.0.53:53 for DNS. Then, resolved will contact DNS specified in our *.network files and use DNSSEC and DNS-over-TLS for name resolution. Awesome!
To enable services in Arch, we will use systemd. To learn more read this Arch Wiki systemd article.
systemctl --help
sudo systemctl enable --now systemd-networkd
sudo systemctl enable --now systemd.resolved
ping archlinux.org
Now, everything should work, so we can do git if you opted in:
cd /etc/
sudo git status
sudo git diff
sudo git add .
sudo git commit
I like to reboot the machine from time to time, so at this point I did shutdown -r now, login back, and enter fish
18. Time and date setup Link to heading
Setting up time should be easy as we already done it once in Arch Live OS.
timedatectl --help
timedatectl status
sudo timedatectl set-ntp true
sudo timedatectl set-timezone Europe/Warsaw
Once done, we can git commit:
cd /etc/
sudo git diff
sudo git add .
sudo git commit
sudo git commit
19. Localization Link to heading
This part is about setting up locale. First we need to edit /etc/locale.gen
sudo nano /etc/locale.gen – uncomment (remove #) your preferred locale, in my case, I like to stay at plain English so uncomment line 177:
en_US.UTF-8 UTF-8
sudo locale-gen
Then, we can use localectl tool
localectl --help
localectl status
sudo localectl set-locale LANG=en_US.UTF-8
If you opted for git then:
cd /etc/
sudo git diff
sudo git add .
sudo git commit
20. Lower GRUB countdown timer Link to heading
When we have monitor connected to the machine we will see boot sequence as well as GRUB menu displayed. The menu has default option that will be executed on every boot, however, it will count down from 5 to give you time to make a decision. This is a great option if you have monitor connected. Once we setup our system, we will probably want to use SSH to connect to it. In that case, the countdown only slows down reboots. In this section, we will change that countdown to 1 second.
sudo nano /boot/grub/grub.cfg
F6 and search for “timeout=” and change 5 to 1
Now, to check it is working correctly, lets execute sudo shutdown -r now and lets watch for the countdown.
21. Setting up Fish shell as default shell Link to heading
As I stated before, I prefer Fish shell much more that Bash. So next step for me is to make fish be default shell when I login. To do so:
cd ~
nano .bashrc
at the end of the file add:
if [[ $(ps --no-header --pid=$PPID --format=cmd) != "fish" ]]
then
exec fish
fi
To check it is working, you can restart the machine sudo shutdown -r now. Once you login, you should see default shell as fish.
22. Setting up SSH Link to heading
Since we will be using this machine headless, we need a way to connect to it from other computers over network. To achieve this, we will use SSH. For this tutorial I will show how to setup OpenSSH. There are other alternatives such as dropbear SSH. First we need to install OpenSSH:
sudo pacman -Syu openssh
There might be some dependencies or updates listed as well. Hit Y and proceed with installation. If you opted for git let’s commit changes:
cd /etc/
sudo git status
sudo git add .
sudo git commit -m 'updates and installed OpenSSH'
the -m allows you to specify commit message without using nano or other editor
Now, lets modify configuration for the SSHd:
sudo nano /etc/ssh/sshd_config
Go to the end of the file and add:
Protocol 2
Port 55501
PermitRootLogin no
PermitEmptyPasswords no
PasswordAuthentication no
PubkeyAuthentication yes
AllowUsers kuba
ChallengeResponseAuthentication no
HostKeyAlgorithms [email protected],ssh-ed25519,ssh-rsa
TCPKeepAlive yes
ClientAliveInterval 60
ClientAliveCountMax 604800
First thing to do, is to modify Port. I never use the default 22 port, and I suggest you use something different. Second thing to check is AllowUsers. Here I specified only my user name. Third thing to check is HostKeyAlgorithms, I only use ed25519 and RSA keys so that what I specified. If you use DSA or ECDSA you might want to add them here. By default OpenSSH will allow any key type to be used.
To enable sshd service using systemd run:
sudo systemctl enable --now sshd
To verify we didn’t make typos in the parameters run:
sudo sshd -t
To check the status of the service run:
sudo systemctl status sshd
If you opted for git run:
cd /etc/
sudo git status
sudo git diff
sudo git add .
sudo git commit -m 'setup OpenSSH'
Because we did not permit to use passwords to login via SSH, we now need to add public key to ~/.ssh/authorized_keys. run:
mkdir ~/.ssh
touch ~/.ssh/authorized_keys
chmod 600 ~/.ssh/authorized_keys
curl https://github.com/kuba86.keys >> ~/.ssh/authorized_keys
The last line will import MINE public keys from github. You need to be connected to internet, have github account, and add your public key to github. You want to replace kuba86 with your github username
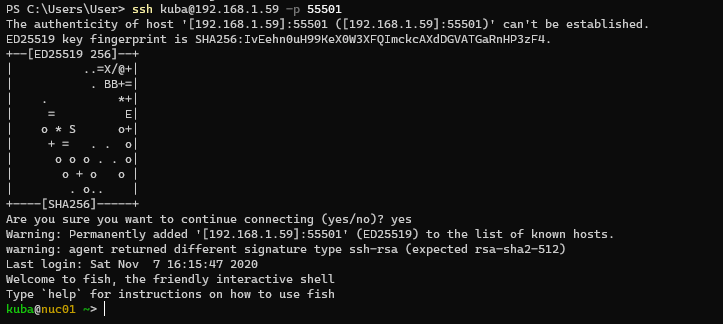
Once we added the keys, lets find out IP address of our machine in our local network with networkctl status. Note the IP address, in my case it is 192.168.1.59, so to connect via SSH, I need to run:
ssh [email protected] -p 55501
ssh [user name]@[IP address] -p [port number]
23. Conclusions Link to heading
Setting up Arch Linux is not easy, and requires a lot of decision making comparing to Ubuntu or other distributions. In my case, I prefer Arch Linux because I have learned so much just by installing it. I know where to look for if my DNS or network is not working, or what systemd is and how to use it. I hope that by following this tutorial you have learned more about Linux, Arch, git, SSH and where to look if you need help with a tool or a command.
Since this is my first article ever, there bound to be mistakes and errors. Feel free to contact me or write a comment if you found this tutorial helpful.